

The Delta Flynn shower faucet installation requires just a few simple tools and is an easy do-it-yourself project. However, you can still encounter a few hiccups that might require a professional plumber, especially regarding the shower valve.
Installing a Delta Showerhead
There are three components to any Delta showerhead: The shower arm (a slightly bent pipe with threads on both ends), the shower flange (which covers the hole in the wall where the shower arm is inserted) and the showerhead (where the water exits). Apply a small amount of Teflon tape to the threads on both sides of the shower arm. Insert the longer side of the shower arm through the wall and into the elbow connection on the water supply pipe. Twist clockwise to tighten.

If you cannot sufficiently hand-tighten the Delta shower arm, wrap it in a thick towel before using an adjustable wrench to tighten it further, ensuring that the bent endpoints downward when finished. Next, slide the shower flange over the shower arm until it rests flat against the wall to cover the hole in the drywall. It does not need to be glued to the wall or sealed.
Finally, attach the Delta showerhead by twisting it clockwise onto the bent end of the shower arm. Delta recommends that you do not over-tighten the showerhead during installation. If your Delta model includes a handheld spray attachment, make sure the showerhead is positioned with the dial in the 3 o'clock position. Then screw the hose onto the connection located below the main Delta showerhead.
Installing a Delta Shower Handle
Installing a new Delta shower handle may require the assistance of a plumber if you're changing from two handles to one handle or vice versa. A professional plumber will also need to help you if your existing valve is not compatible with Delta shower fixtures. If neither of these circumstances applies, you can continue with the installation procedure. Turn off the water supply to the shower before starting.

First, remove the bonnet nut from the valve by twisting it counterclockwise by hand and then pull out or unscrew the test cap and the screen if applicable. You can now insert your Delta cartridge but ensure that the words "Hot Side" are to the left when you do so. The cartridge has a built-in "key" that fits into a slot on the valve to help you place it in the correct position. Slide the bonnet nut over the cartridge and tighten it by hand.
Next, slide the O-ring over the cartridge until it rests just under the bonnet nut. Then slide the handle sleeve over the entire cartridge assembly and follow it with the escutcheon plate, which is secured to the wall with two hand-tightened screws. If your Delta shower faucet has a temperature control valve, adjust it before continuing with the installation.
Installing a Delta Tub Spout
Delta tub spouts come with an adapter and the actual spout fixture. You should see a threaded pipe protruding from the wall where the tub spout will go. If this "pipe nipple" already has an adapter on it, it may not be the correct size for your new Delta tub spout. Remove the existing adapter by using an adjustable wrench and turning counterclockwise.
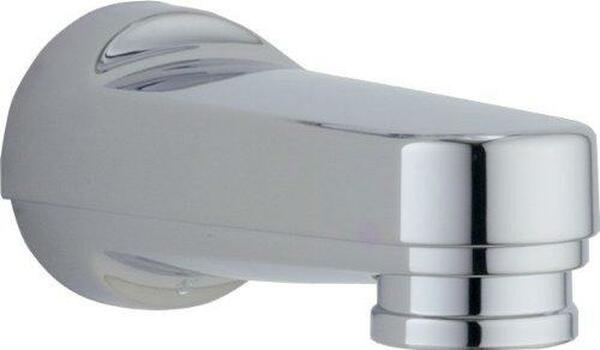
Apply a small amount of Teflon tape to the threads on the pipe nipple; then twist on the adapter. After hand-tightening the adapter, tighten again with an adjustable wrench.
Finally, place the Delta tub spout over the adapter until it's flush against the wall. Twist the entire tub spout clockwise until it's tight and points downward. Note that if the Delta tub spout does not reach the wall, you should call a plumber to adjust the length of the pipe nipple.