

When looking for a cartridge, it is important to understand the model/series number of your Delta Trim Kit. The Delta 1400 and 1300 Series Trim Kits come with a single function cartridge, while the 1700 Series Trim Kits come with a Dual-Function Cartridge.
How does a Delta Monitor shower faucet work?
The latest innovation in Delta Monitor Shower Faucet is the Thermostatic Shower Valve Cartridge. It is designed to maintain water temperature steady (+/-3 degrees F) by monitoring and measuring the temperature of the water. Then, it automatically adjusts the water mix to keep a more accurate water temperature.
Moreover, how does a Delta Monitor shower faucet work?
You switch the trim that pulls water from the source. Hot water stops in the water heater first, while the cold water goes straight to the cold pipe. Water from the two pipes meets at the shower valve. At this point, the two are mixed and sent to the shower tub spout or head.
How to Replace the Cartridge of a Delta Monitor Shower Faucet
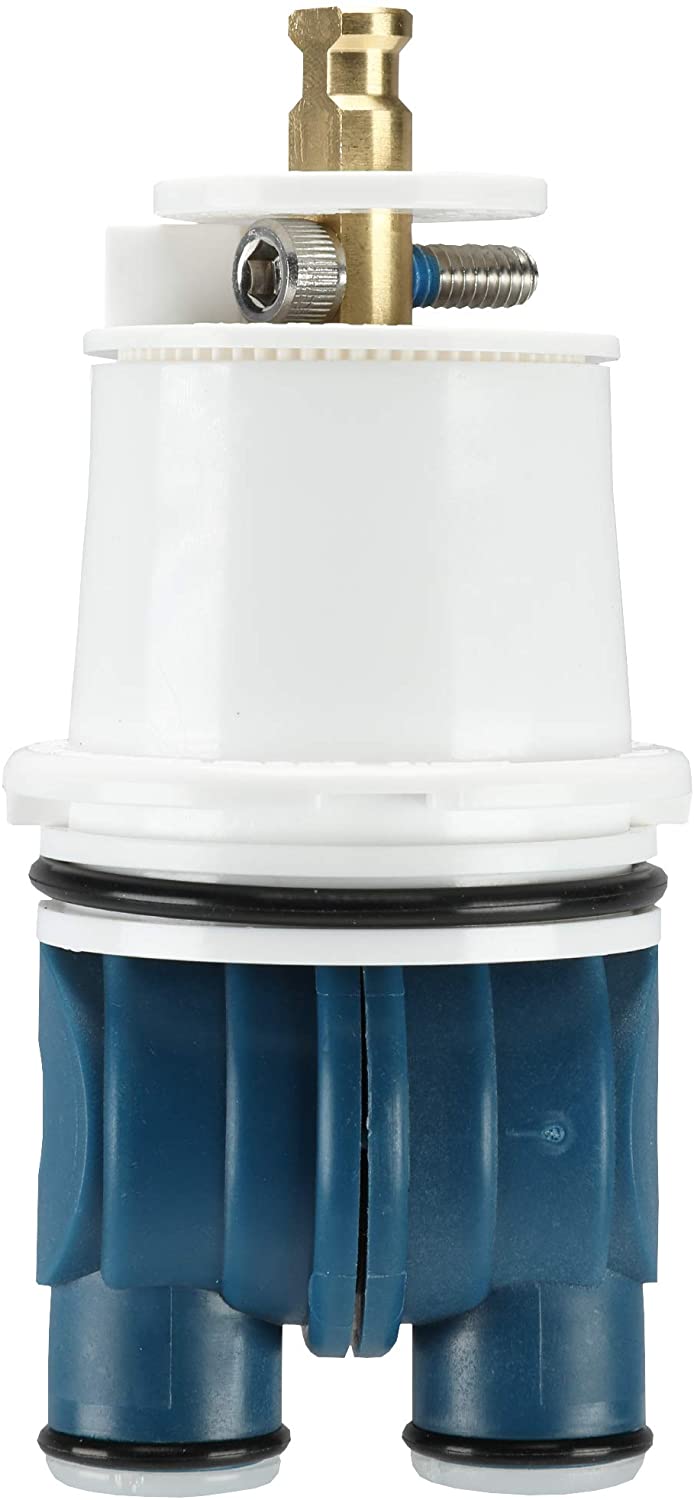
The main reason for this part is to explain how to replace the cartridge of a Delta Monitor shower faucet. The cartridge is the heart of the valve in a shower faucet. If the cartridge is faulty, water will leak out continuously through the spout, or you will realize a sudden pressure drop. This will also reduce your water bill, hence saving you money.
This work can be done using common household tools. If you don't have any of the tools listed below, you can buy them at your local hardware store. The store should also have a replacement cartridge for the Monitor shower faucet. To ensure the shower valve is a Delta Monitor, check on the trim plate if there are words “Monitor” on the top and “Delta” on the bottom. This task can be completed in about 20 minutes.
Tools
- Faucet Grease
- Needle Nose Pliers
- Tongue and Groove Pliers
- Allen Wrenches
- New Cartridge
Step 1: Drain the System
- Identify the main water supply shut-off for the apartment. It is usually located in the basement of the duplex or house. You will notice either a ball valve or a different one.
- Close the ball valve off by rotating the handle in an anticlockwise direction. Adjust the handle to a full 90⁰ from its initial position. For the other valve style, rotate the handle in a clockwise direction until it is fully closed.
- Confirm if the water is turned off by switching on a nearby faucet. The water pressure should reduce and stop flowing after about 30 seconds. If the water does not stop completely, go back to the main water supply, turn it counterclockwise to open it back, and shut it off again. If the water flow does not stop, call a professional to repair your valve.
- When the water is shut off completely, allow the faucet to remain open so that the water in the pipes drains when the shower cartridge is removed.
Step 2: Remove the Trim
- Identify the set screw on the handle. This is a recess located on the handle. To disconnect it, remove the level to access the screw.
- After you remove the level, you can locate the screw. Try to gauge what size of Allen wrench you need. Insert the Allen wrench into the hole. Twist the wrench back and forward to ensure that the Allen wrench is well seated into the screw. If the Allen wrench does not rotate completely, you are using the correct size of the wrench. If the wrench moves freely, select a different one. In other trim styles, the set screw is located in the recess under the level.
- Untighten the set screw and detach the handle.
- Remove the chrome collar by pulling it straight back as you twist.
Step 3: Unscrew the Bonnet
Hold the bonnet and twist it counterclockwise using your hand until it is completely removed. For an older valve, the channel locks should be well handled to be able to remove the bonnet.
Caution: Do not apply excessive force when using the Allen wrench as it may deform the bonnet.
Step 4: Remove the Cartridge
Hold the old cartridge and pull it straight back. Apply steady pressure to slightly wiggle the cartridge up and down. If the cartridge does not come out, you can remove it using tongue and groove pliers. You can as well use the needle pliers.
Step 5: Install the New Cartridge
- Put a small dab of grease on your finger and lubricate the O-rings of your new cartridge. This will make it easy to install the cartridge and allow it to rest in the valve body.
- Identify the side labeled H that shows the hot side of the cartridge. As you insert the cartridge, ensure the H is on the hot side of the valve, which is on the left-hand side. The H is gray and raised for easy identification.
- Make sure the notches of the cartridge are in line with the indents of the valve body.
- After alignment, apply constant pressure on the cartridge until the gap between the notches is fully closed.
Step 6: Replace the Bonnet and Turn the Water Back On
- Once you install the cartridge, replace the bonnet. Hand-tighten and, if necessary, loosen the bonnet using pliers, still hand tighten it by hand.
- Open the main shut-off valve slowly about halfway. Leave the faucet on to release the pressure as the system is filling. After all, the air is removed, and a constant stream runs out, shutting off all the faucets and allowing the system to fill. Turn on the main water shut off.
- Check the shower valve to ensure there are no leaks. If there is a leak, follow steps 2-7 again. If it persists, contact a professional.
Step 7: Replace the Handle and Chrome Collar
- Change the chrome collar.
- Next, replace the handle and tighten the set screw. Do not over-tighten the screw.
You have successfully repaired your Delta shower faucet when the shower valve is well assembled, and there are no more leaks.
How to Fix a Delta Monitor Shower Faucet
Is this your first time fixing a Delta Shower Faucet? Then, prepare for some challenges. It may take about an hour or more to repair the entire unit, but it can be easy if you employ DIY.
Tools
- Faucet replacement kit
- Allen wrench
- Plumber's grease or putty
- Channel-lock pliers
Step 1: Turn off the Water Supply
Before starting the process, make sure the water supply to your Delta Shower faucet is shut off.
Step 2: Remove Set Screw Lever Handle
Using the correct Allen wrench, remove the set screw lever handle. First, get rid of the small-cap at the base of your Delta Monitor shower faucet handle, then the temperature regulator handle. Finally, remove the screw with a lot of care.
Step 3: Remove the Covering, Bonnet, and O-Ring
If you can't remove the bonnet or trim sleeve smoothly, use the channel-lock pliers as sediments could accumulate. Ensure that the stop-cap is restored to the original position.
Step 4: Remove the Cartridge
Pull the cartridge backward and get rid of it from the faucet head. If the cartridge is stuck in the faucet, you can use the channel-lock pliers to remove it.
Step 5: Replace O-Rings
Coat each new O-ring with the plumber's grease and insert them into the new cartridge at the back portion. Place the cartridge on top of the faucet head and apply little pressure to make it fit into the unit.
Step 6: Reassemble the Delta Monitor Shower Faucet
Assemble all the parts you had removed. Replace the older covering or the trim sleeve, temperature control knob, bonnet, and the stop limit of the Delta Monitor shower faucet. Tighten the set screw well to maintain the parts together.
Important Tips to Consider:
- Before removing the valve cartridge unit, note the stop position on the cap to put it back in the same place. Usually, the stop faces to the left.
- After everything is done, switch on the faucet's valve to allow cold water to run down first to avoid scalding.
- Do not pry the valve cartridge out of the Delta Monitor shower faucet head using a screwdriver. Use the right tool. Hold its apex using the channel-lock pliers, rotate it a quarter turn in the counterclockwise direction, and lift the cartridge out.
- Carry out a regular inspection on your Delta shower faucet when the water supply has a high concentration of lime, minerals, rust, and other impurities. Remove the cartridge as discussed above. Adjust the cartridge valve to a full mix point and shake it well. If you notice a rattling noise, reinstall it and if there is no noise, replace the cartridge.
- When replacing the seats and springs, start by replacing the bigger spring into the seat pocket and securing it.
Our Delta products are one of the most popular products we carry. Find more Delta faucet products here!
Robert Syengo is an experienced web writer with a home improvement history that includes toilet remodeling and appliance installation. He enjoys writing and learning about electronics, gardens, design, remodeling and repair.